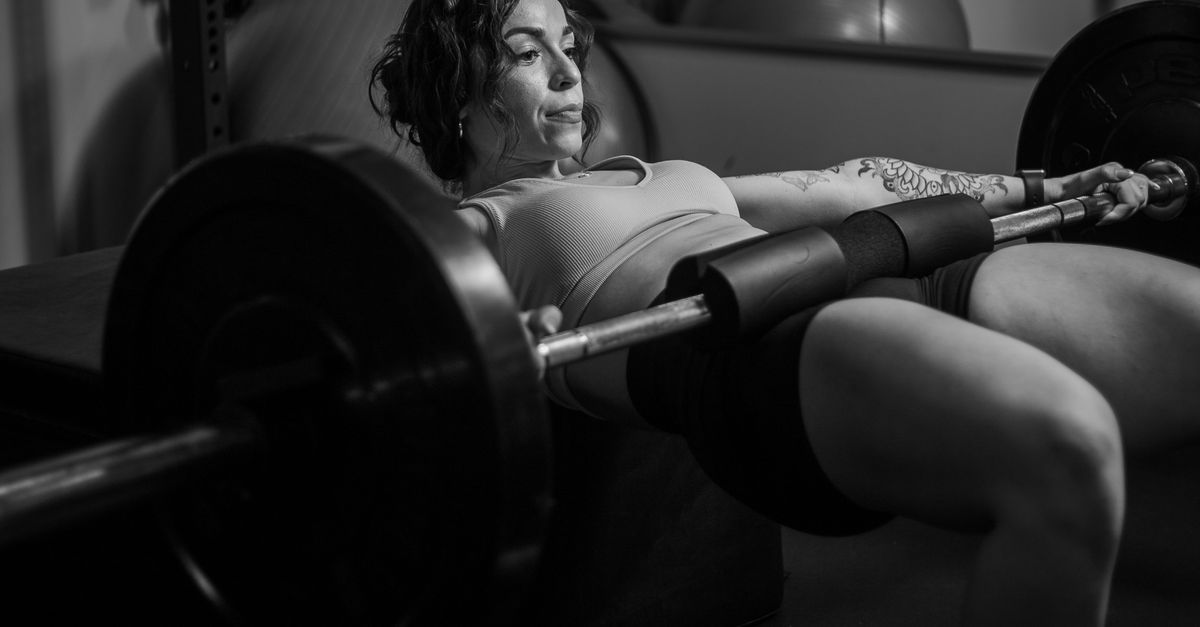
Ever walk into a gym, see someone wedged beneath a barbell pushing their hips to the ceiling, and think, “That looks wildly uncomfortable”? You are definitely not alone. If you have been dealing with a sleepy backside from sitting all day at work, or you just want to build genuine lower-body power, the hip thrust is your best bet. Still, setting it up can make anyone feel self-conscious. This guide breaks down the whole exercise into bite-sized, easy pieces. You will learn how to pick the right bench, place your feet properly, protect your lower back, and move with smooth control. Stick around, and you will walk into your next workout knowing exactly what to do.
Waking Up the Body’s Biggest Engine
Your glutes are the powerhouse of your entire body. They help you sprint, jump, walk up stairs, and even stand upright without collapsing. The trouble is, modern life loves chairs. When we sit for hours, our glutes take a long nap, leaving our lower backs to do all the heavy lifting. That is why so many people end up with annoying aches after a long day.
The hip thrust changes that by forcing your backside to do its actual job. Unlike squats, which work your thighs quite a bit, hip thrusts focus almost entirely on your glutes. Think of your hips like a rusty door hinge. This movement oils that hinge and builds the muscle around it, giving you better posture and way more daily energy.
Setting the Stage: The Bench and Bar
Setting up your station correctly makes or breaks this movement. If the bench is too high, you will roll backward. If it is too low, you will strain your neck trying to get off the floor.
Picture a fictional beginner named Alex. Alex walks over to a tall aerobic box, leans back, and immediately slides off because the box sits way above their shoulders. Alex leaves the gym feeling defeated. To avoid that, you want a bench that sits right around knee height, usually twelve to sixteen inches off the ground.
Here is what you need for a comfortable setup:
- A sturdy bench: Make sure it is backed up against a wall or heavy weight plates so it does not slide away while you lift.
- A soft pad: Whether you use a dumbbell or a barbell, your hip bones will hate you if you do not pad the metal. A foam pad or rolled-up yoga mat works wonders.
- The sweet spot: Sit on the floor with your back against the bench. The bottom edge of your shoulder blades should rest right along the top corner of the pad.
Finding Your Footprint
Once your back is against the bench, you have to sort out your feet. Foot position is everything here. If your feet are too far out in front, you will feel your hamstrings burning behind your knees. If they are pulled too close to your rear, your knees will take all the heat.
Slide your feet flat on the floor, roughly shoulder-width apart. Flare your toes out just a tiny bit, like ten degrees, so your knees have room to track outward naturally. When you push your hips up into the air, look down at your lower legs. Your shins should make straight, vertical lines, just like the legs of a sturdy kitchen table. That ninety-degree angle at your knees means you nailed the placement.
Eyes Forward, Chin Tucked
This is where almost everyone messes up on their first try. People love to throw their heads back and gaze at the ceiling like they are stargazing. Don’t do that.
When you tilt your head back, your lower back naturally arches like a bow. Arching puts tons of pinch on your spine, which leads to soreness you definitely do not want. Instead, tuck your chin toward your chest as if you are holding a tennis ball under your jaw. Pick a spot on the gym wall directly in front of you and keep your eyes locked on it through every single repetition. Keeping your ribs pulled down and your gaze forward locks your spine into a safe, flat board.
The Lift: Driving Through the Floor
Now that your body is in position, it is time to move. You do not need to jerk the weight or yank your body upward. Smooth and steady wins the race here.
Take a breath, brace your stomach like someone is about to poke you, and drive down through your heels. Push the floor away from you. As your hips rise, squeeze your butt muscles as hard as you can, like you are trying to hold a coin between your cheeks. Pause for a split second at the very top. In that top position, your shoulders, hips, and knees should form a straight, level line from side to side. Lower yourself slowly back down toward the floor, keeping your ribs pulled in, and get ready for the next rep.
Common Traps and Quick Fixes
Learning a new move always comes with a few bumps in the road. Fortunately, most hip thrust mistakes are super easy to spot once you know what to look for.
- Hyperextending at the top: You do not get bonus points for pushing your hips as high as the sky. Stop when your torso is parallel to the ground.
- Lifting your heels: If your heels pop up, your quads are taking over. Keep your feet completely glued to the turf.
- Letting your knees cave in: Your knees should stay pushed outward, following the direction of your toes. Think about ripping the floor apart beneath your sneakers.
Mastering the hip thrust does not require secret superpowers. It is really just about respecting your body’s natural angles. By matching your bench height to your shoulder blades, lining up your shins like table legs, and keeping your eyes glued forward, you turn an odd-looking exercise into your best tool for total lower-body strength. We love breaking down these tricky gym puzzles at our training hub because nobody should feel lost while trying to improve their health. The next time you walk into the weight room, you won’t have to second-guess yourself. Grab a bench, find your stance, tuck your chin, and start driving. Your glutes and lower back will definitely thank you later.